This Easy Scones recipe requires just FOUR Ingredients to make and you can have these scones ready to go into the oven within 10 minutes! These Scones are deliciously soft and fluffy with just the right amount of crust. They are best enjoyed slightly warm and slathered with a generous helping of jam and cream – in that order of course! This recipe includes both conventional and Thermomix cooking instructions.

Why you will love this recipe!
If you are looking for the perfect morning or afternoon tea treat, this recipe is for you. All you need is four simple ingredients that are probably already in your pantry and fridge (woohoo!) and within half an hour you will have a batch of fresh scones in your kitchen.
- Quick to make – these Scones take less than 30 minutes to prepare and bake.
- Freezer Friendly – you can pop any leftovers into the freezer and store for up to three months.
- Budget friendly – this recipe requires simple ingredients you may already have at home.
- Lunchbox Snack – you can make smaller sized scones (the cooking time will need to be amended) to pop into the kids lunchboxes for a treat.

Ingredients
- Self-raising flour – you can make your own if you only have plain flour, add 1 teaspoon of baking powder for each cup of flour.
- Butter – for best results when combining the flour and butter, use butter that has been cut into 1-2cm pieces and is chilled from the fridge.
- Milk – you can use either full fat or reduced fat milk for this recipe.

Method:
This Scones recipe really is simple to make, especially as you only need four ingredients to put it together!
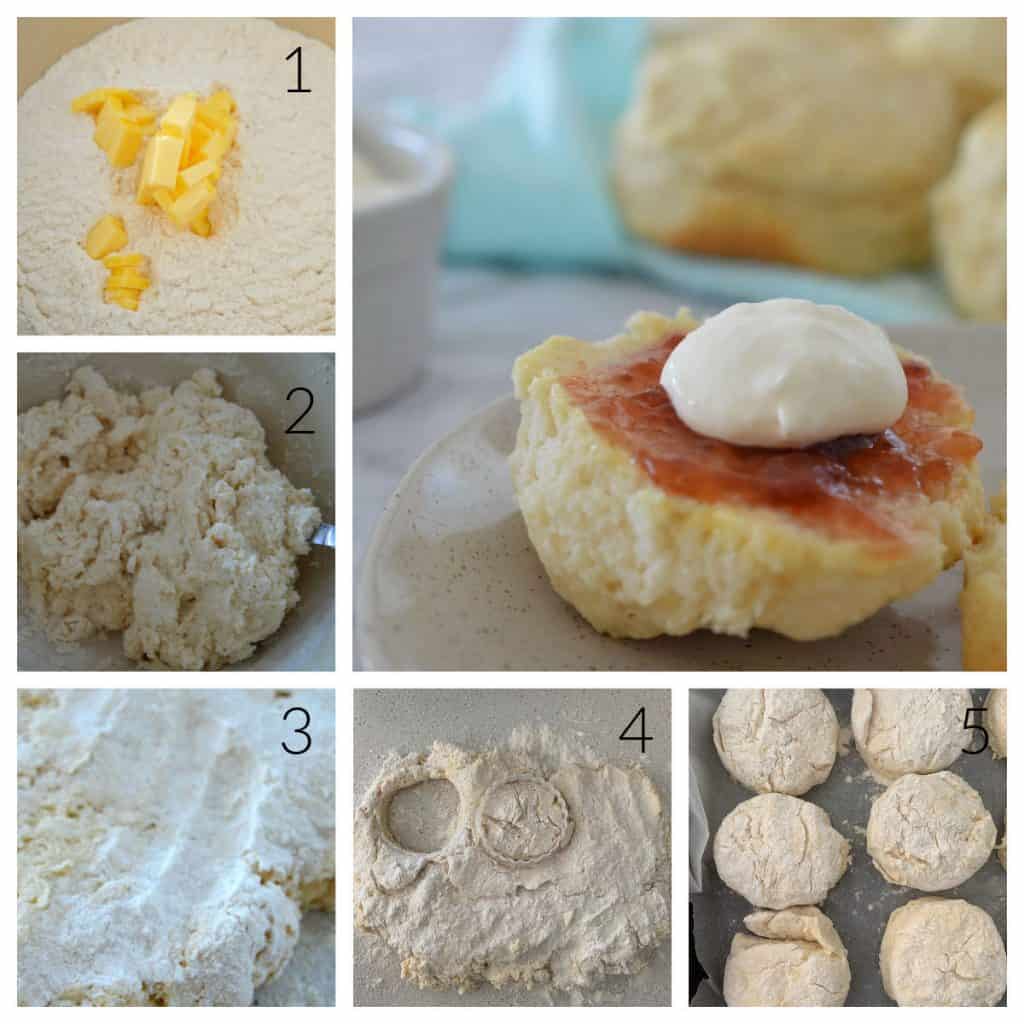
- Rub the butter pieces into the flour.
- Add the milk and gently mix to combine.
- Turn the dough out onto a bench which has been lightly coated with flour and gently shape into a rectangle.
- Cut out the scones using a round cutter.
- Place onto your baking tray and lightly brush with milk before popping into the oven.
Tips for making the BEST Scones:
- Take care not to over mix the scone dough, if you mix it too much the scones will lose some of their lightness.
- The mixture will be quite sticky when you tip it onto your bench – this is normal. I suggest to spread approximately ¼ cup of extra flour over your bench and lightly dust your fingertips with flour when shaping the dough into a rectangle.
- Dip your cookie cutter into flour to help the scones easily be removed.
- Place the scones so that they are almost touching each other onto your baking tray, this will help them to rise up instead of outwards.
- If you wish, you can brush a little milk over the top of the scones before baking, however this isn’t essential.
- The cooking time will vary depending on the size of your scones, I suggest checking them at the 10 minute mark.
- You will know the scones are cooked when they sound hollow when lightly tapped.
More Classic Recipes:
- 3 Ingredient Lemonade Scones Recipe
- Vanilla Butter Cake
- Easy Ginger Nut Biscuits Recipe
- Date Scone Recipe
- Orange and Sultana Muffins
- Fairy Biscuits
- Pumpkin Scone Recipe
- Quick and Easy – Vanilla Snap Biscuits
- Choc Chip Banana Bread


Easy Scones Recipes – 4 Ingredients!
Equipment
- 1 x baking tray
Ingredients
- 4 cups self raising flour 600 grams – plus a little extra to dust bench
- ½ teaspoon salt
- 90 grams butter chopped into 2cm pieces.
- 2 cups Milk 480 grams – plus a little extra to brush the top of the scones with
Instructions
- Preheat your oven to 230 degrees celsius (fan-forced) and line a large baking tray with baking paper.
- Place the flour and salt into a large bowl.
- Add butter (which has been cut into cubes) and use your fingertips to rub it into the flour and salt mixture until it resembles breadcrumbs.
- Add just under the 2 cups of milk and mix together with a butter knife – if your mixture is too dry, add the remaining milk.
- Turn the scone mixture onto a floured surface and knead lightly to bring it together into a dough.
- Use your hands to shape the scone mixture until it’s approximately 3cm thick and dip your cutter into a little flour and cut out the scones.
- Bring excess dough back together and cut out more scones until all of the mixture has been used.
- Place the scones into the baking tray so that they are almost touching and use a pastry brush to brush a little milk over the top of them.
- Place the scones into your preheated oven and bake for 12 -15 minutes or until risen and golden.
Thermomix Instructions
- Preheat your oven to 230 degrees celsius (fan-forced) and line a large baking tray with baking paper.
- Place the flour and butter into the bowl of your Thermomix and blitz for 10 seconds on speed 9 or until the mixture resembles breadcrumbs.
- Add the milk and salt and mix for 10 seconds on speed 4 or until combined.
- Knead the mixture for 40 seconds.
- Pour onto a floured surface (don’t worry it will be soft and sticky) and gently work the mixture into a rectangle which is approximately 3cm thick.
- Coat a round cutter in flour and cut our your scones. Place them close together (you want the to almost be touching) on your baking tray. Continue until you have used all the mixture.
- Brush with a little milk and place the tray into the oven for 12 – 15 minutes. The scones are ready when they begin to turn golden and make a hollow sound when tapped.
- Carefully remove the tray from the oven and allow to cool for 5 minutes.
Notes
- Take care not to over mix the scone dough, if you mix it too much the scones will lose some of their lightness.
- The mixture will be quite sticky when you tip it onto your bench – this is normal. I suggest to spread approximately ¼ cup of extra flour over your bench and lightly dust your fingertips with flour when shaping the dough into a rectangle.
- Dip your cookie cutter into flour to help the scones easily be removed.
- Place the scones so that they are almost touching each other onto your baking tray, this will help them to rise up instead of outwards.
- If you wish, you can brush a little milk over the top of the scones before baking, however this isn’t essential.
- The cooking time will vary depending on the size of your scones, I suggest checking them at the 10 minute mark.
- You will know the scones are cooked when they sound hollow when lightly tapped.
Nutrition
Looking for more easy snack recipes?
Why not check out our Snacks and Lunchbox Recipe books? You can shop the full range of books and eBooks here.












Bee
So easy and delicious! Took them to work and got so many comments on how good they were!
Lauren Matheson
That’s fabulous, so glad everyone enjoyed them x
Jessica
I want to try traditional scone.. thanks for sharing
Lauren Matheson
Enjoy!