


These Mars Bar Cheesecake Balls are the ULTIMATE sweet treat! Made with just THREE ingredients (Cream Cheese, Mars Bars and Chocolate, they really are the PERFECT dessert or treat for your next special occasion! This recipe is also no bake, and can be made up to three days in advance and then stored in an airtight container in the fridge until needed. Both regular and Thermomix instructions are included.
If you love my Mars Bar Cheesecake and/or Mars Bar Slice recipe, then these cute bite sized Mars Bar Cheesecake Balls may just become your new favourite dessert!
Why you will love this recipe:
They are based on my Snickers Cheesecake Balls recipe and I’ve simply replaced the Snickers bars with Mars Bars and then added an extra piece of Mars Bar on top, after all, you can never have too much Mars Bars in one dessert right?!
- THREE ingredients – who doesn’t love a three ingredient recipe right?
- Can be doubled – feeding a crowd? You can easily double this recipe.
- Freezer friendly – you can freeze the cheesecake balls before dipping in chocolate.
- No bake – perfect for summer entertaining.
Ingredients
Please note you will find the full ingredients list and method in the recipe card below.
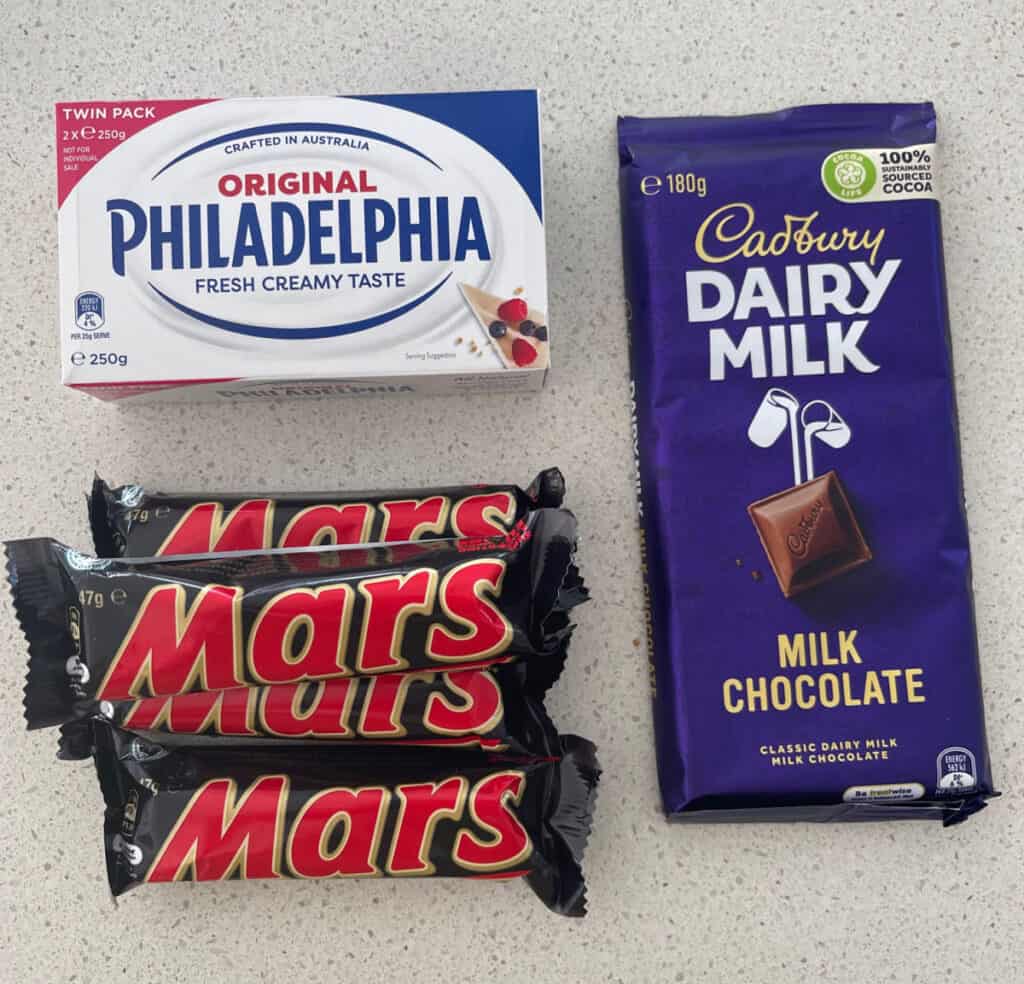
- Mars Bars – I use the standard 47 gram Mars Bars, however you can also use the fun size Mars Bars if you prefer.
- Cream Cheese – you will need one block for this recipe.
- Milk Chocolate – I find 1 and ½ blocks of chocolate gives you the perfect amount to generously cover these cheesecake balls with. You can use dark chocolate if you prefer.
How to Make Mars Bar Cheesecake Balls:
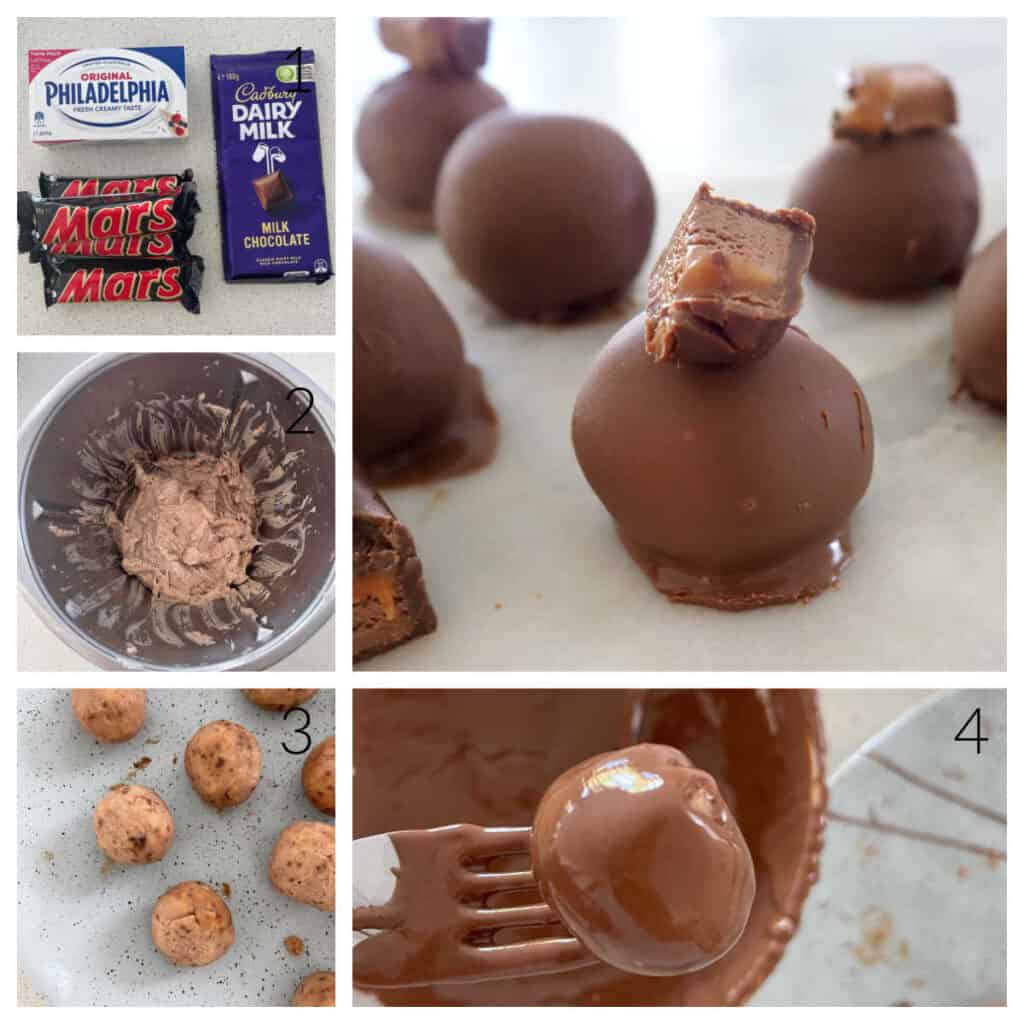
- Blitz THREE Mars Bars in a food processor/Thermomix to crush.
- Add the softened cream cheese and combine.
- Place the mixture into the fridge for half an hour (or longer if in a warm environment) to chill.
- Use a teaspoon to scoop up the mixture and roll into balls.
- Place onto a plate and pop into the freezer to firm.
- Melt the chocolate
- Dip the balls into the chocolate to cover and pop back into the fridge to set.
Tips for Making this Recipe:
- These Mars Bar Cheesecake Balls can be made up to three/four days in advance. Store in an airtight container in the fridge.
- You can freeze the cheesecake balls BEFORE dipping in the chocolate. Store in a freezer safe container for up to two months.
- Either dark or milk chocolate can be used for this recipe.
- If the mixture is too soft to work with, place into the fridge to chill.
- I recommend placing the balls into the freezer to firm before dipping in chocolate.
- I find the easiest way to dip these balls is to use two forks and rolls around in the melted chocolate.
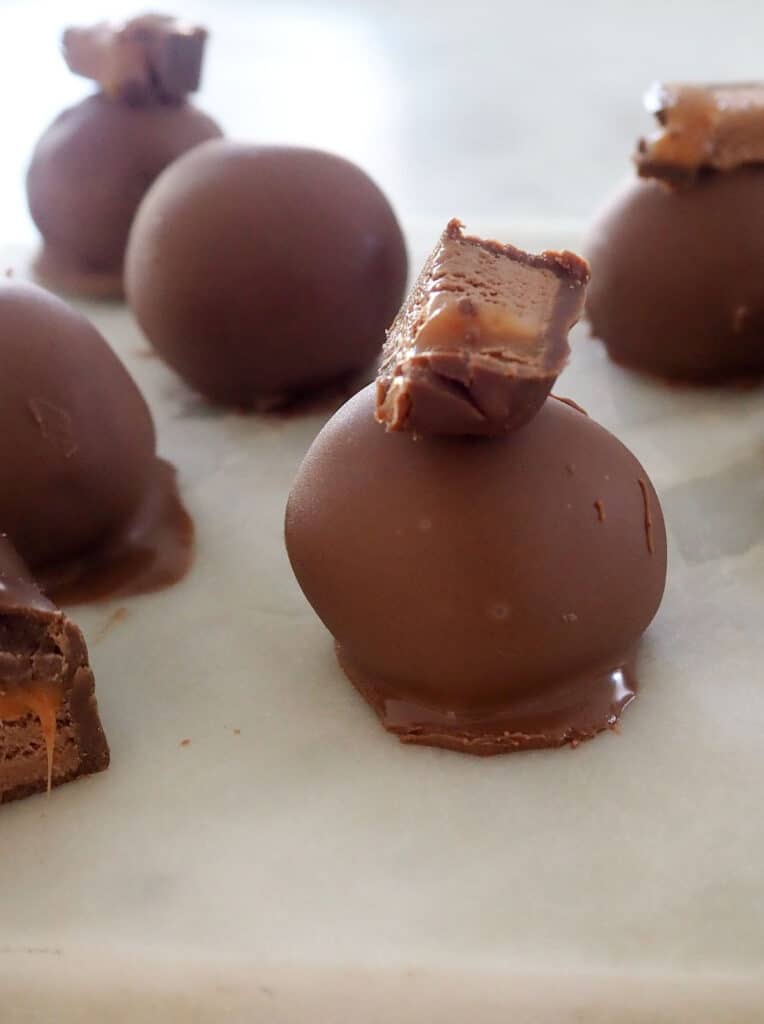
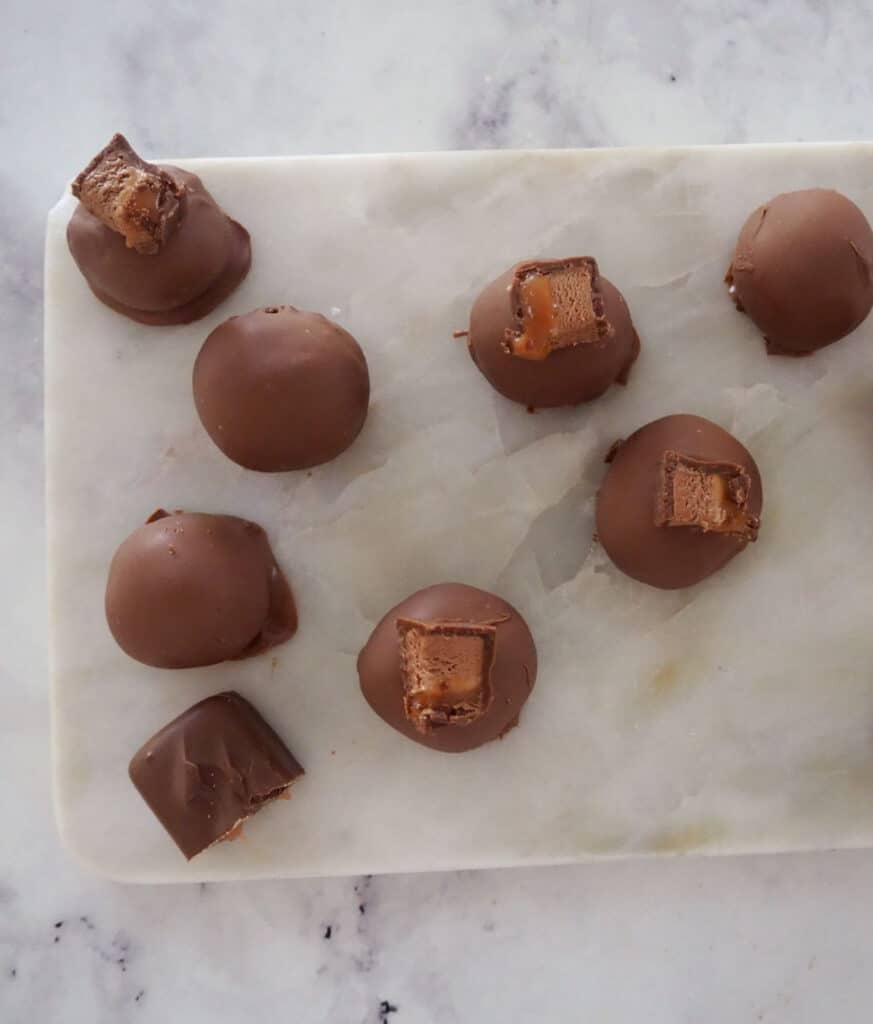
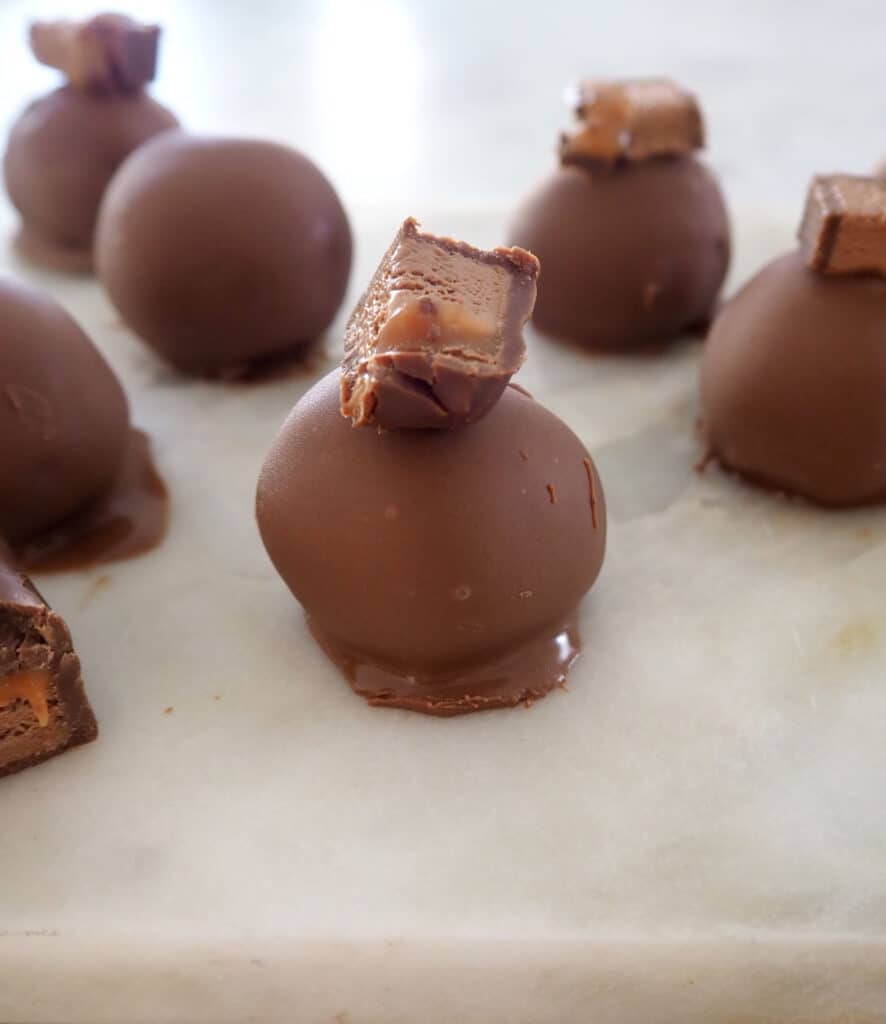
- You can leave the top of the balls plain or add a piece of Mars Bar to decorate.
- Once made, store in the fridge and enjoy within one week.
Looking for more?
You will also enjoy these delicious dessert recipes:
- No Bake Mars Bar Cheesecake
- Toblerone Cheesecake Balls
- No Bake Mango Cheesecake
- Trifle Recipe | Easy No Bake Dessert
- Easy Caramel Tarts
- Mars Bar Slice | 5 Ingredient No Bake Slice
- 4 Ingredient No Bake Malteser and Mars Bar Fudge Recipe
- Chocolate Ripple Cake
- Tim Tam and Baileys Cheesecake
- Easy Chocolate Trifle Recipe

Mars Bar Cheesecake Balls
Equipment
- Food Processor
Ingredients
- 4 Mars Bars 47 gram Mars Bars
- 250 grams cream cheese softened
- 300 grams milk chocolate
Instructions
- Line a baking tray (or plate) with baking paper and set aside until needed.
- Using a food processor, blend THREE of the Mars Bars until they become a lumpy paste.
- Add the softened cream cheese and blend until combined.
- Place mixture into freezer for 15 minutes to firm
- Roll the mixture into balls (I made mine dessert spoon sized) and place on tray. Continue until all the mixture has been used.
- Place tray/plate into the freezer for a minimum of half an hour, as you want the cheesecake balls to be very firm.
- In the meantime, break the milk chocolate into pieces and place in a microwave safe bowl to melt (you can also melt the chocolate in a bowl sitting above a saucepan on boiling water on the stove). I cook the chocolate for 30 second spurts until it’s almost melted and then stir it until it had completely melted.
- Remove the balls from the freezer. Use two forks to cover in the chocolate Place on a wire rack to set. Repeat until all the balls are coated.
- Decorate the balls while the chocolate is still soft a small piece of Mars Bar. Repeat until all of the mixture has been used.
- Place the Mars Bar Cheesecake Balls back into the freezer for half an hour, or until the milk chocolate has set before serving or transferring into an airtight container in the fridge.
Thermomix Instructions
- Line a baking tray (or plate) with baking paper and set aside until needed.
- Place THREE of the Mars Bars into your Thermomix bowl and blitz for 5 seconds on speed 7.
- Add the softened cream cheese to the Thermomix bowl with the crushed Mars Bars and blitz for 10 seconds on speed 5. Scrape down the sides of your Thermomix bowl and mix for a further 10 seconds on speed 5 or until combined – it may take a little longer if your cream cheese isn’t completely soft.
- Place the mixture into the freezer for 15 minutes to firm.
- Roll the mixture into balls (I made mine dessert spoon sized) and place on tray. Continue until all the mixture has been used.
- Place tray/plate into the freezer for a minimum of half an hour, as you want the cheesecake balls to be very firm.
- In the meantime, break the milk chocolate into pieces and place in a microwave safe bowl to melt (you can also melt the chocolate in a bowl sitting above a saucepan on boiling water on the stove). I cook the chocolate for 30 second spurts until it’s almost melted and then stir it until it had completely melted.
- Remove the balls from the freezer. Use two forks to roll the balls in the melted chocolate. Place on a wire rack to set. Repeat until all the balls are coated.
- Decorate the balls while the chocolate is still soft a small piece of Mars Bar. Repeat until all of the mixture has been used.
- Place the Mars Bar Cheesecake Balls back into the freezer for half an hour, or until the milk chocolate has set before serving or transferring into an airtight container in the fridge.
Notes
- These Mars Bar Cheesecake Balls can be made up to three/four days in advance. Store in an airtight container in the fridge.
- You can freeze the cheesecake balls BEFORE dipping in the chocolate. Store in a freezer safe container for up to two months.
- Either dark or milk chocolate can be used for this recipe.
- If the mixture is too soft to work with, place into the fridge to chill.
- I recommend placing the balls into the freezer to firm before dipping in chocolate.
- I find the easiest way to dip these balls is to use two forks and rolls around in the melted chocolate.
- You can leave the top of the balls plain or add a piece of Mars Bar to decorate.
- Once made, store in the fridge and enjoy within one week.
Nutrition
Looking for More?
You can find more great no bake desserts in our books and eBooks – shop the range here.

Judith
What size/weight of Mars bars do you use? I’m in the UK and the Mars bars here seem to have shrunk in size ….. and have different sizes too.
Lauren Matheson
Hi Judith, the ones I use are 58grams x