• Skip to primary navigation
  • Skip to main content
  • Skip to primary sidebar
Create Bake Make
  • Home
  • Recipes
    • Biscuits and Cookies
    • Cakes and Muffins
    • Lunchbox Ideas
    • Slices
    • Dinners
    • Desserts
    • Snacks & Treats
    • Cheesecake
    • Breakfast
    • Party Food
    • Easter
    • Christmas
  • Thermomix
    • Thermomix Biscuits
    • Thermomix Cakes and Muffins
    • Thermomix Dinners
    • Thermomix Desserts
    • Thermomix Lunch Box Snacks
    • Thermomix Slices
    • Thermomix Easter Recipes
    • Thermomix Christmas Recipes
  • Food for Kids
  • SHOP
  • About
    • Facebook
    • Instagram
    • Pinterest
    • RSS
    • Twitter
menu icon
go to homepage
  • Lunchbox Ideas
  • Dinners
  • Thermomix Recipes
  • Sweet
  • All Recipes
  • Shop
    • Facebook
    • Instagram
    • Pinterest
  • subscribe
    search icon
    Homepage link
    • Lunchbox Ideas
    • Dinners
    • Thermomix Recipes
    • Sweet
    • All Recipes
    • Shop
    • Facebook
    • Instagram
    • Pinterest
  • ×
    • Two Chocolate Snickers Brownies sitting on top of each other.
      Snickers Chocolate Brownies
    • Biscoff Cheesecake
    • Overhead view of corn relish dip in a blue bowl surrounded by crackers.
      Corn Relish Dip
    • Cheese Sauce dripping from a silver spoon into a bowl.
      Thermomix Cheese Sauce
    • Slice of Focaccia on a white bench. In the background are more slices of Focaccia.
      Thermomix Focaccia
    • Two slices of biscoff brownies on top of each other. in the background in a jar of biscoff.
      Biscoff Brownies
    • Side view of Thermomix zucchini slice on a green plate
      Thermomix Zucchini Slice
    • Close up of Curried Eggs topped with chives on a blue plate.
      Curried Eggs
    • Two Margaritas made using a thermomix in glasses garnished with salt and lime.
      Thermomix Margaritas
    • Side view of Cranberry and Brie Puff Pastry Star with a piece of brie removed
      Cranberry and Brie Puff Pastry Star
    • Close up of a piece of Biscoff Fudge on a sheet of baking paper. In the background is more fudge and jar of Biscoff spread.
      Biscoff Fudge
    • Slice of Vanilla Sheet Cake sitting in front of a wire rack.
      Vanilla Sheet Cake
    Create Bake Make / Cheesecake / No Bake Mars Bar Cheesecake

    No Bake Mars Bar Cheesecake

    Published: Jan 19, 2016 · Modified: Feb 26, 2021 by Lauren Matheson ·

    3444 shares
    • Share
    • Tweet
    Jump to Recipe Print Recipe

    After looking back on the most popular recipes of 2015, it was pretty easy to see that you guys LOVE all things Mars Bar!  So it only made sense to come up with an easy and delicious no bake Mars Bar Cheesecake recipe that I’m quietly confident you are going to love.

    The best Mars Bar Cheesecake Recipe

    This recipe is based on my Maltesers and Mars Bar Cheesecake recipe and is filled with SIX (yep that’s right!) Mars Bars, which makes this a dessert not to eat if you are watching the calories.The best Mars Bar Cheesecake Recipe

    To add to it’s deliciousness, I used Oreo Cookies when making the base. However you could easily substitute these with Chocolate Ripple biscuits if you prefer.

    The best Mars Bar Cheesecake Recipe

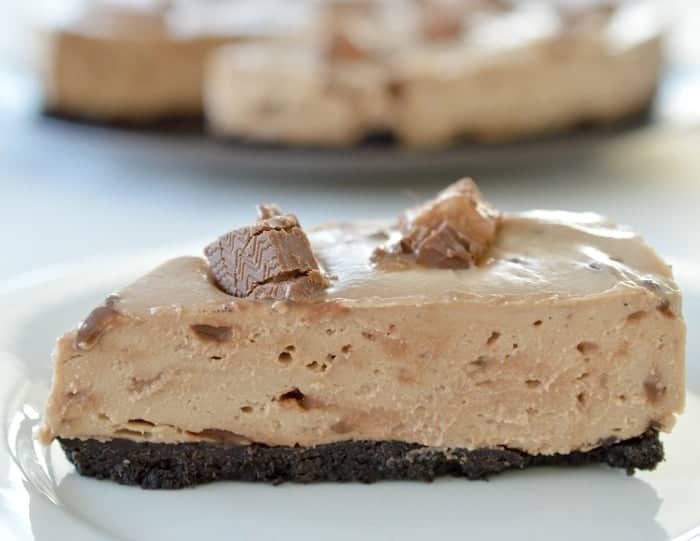
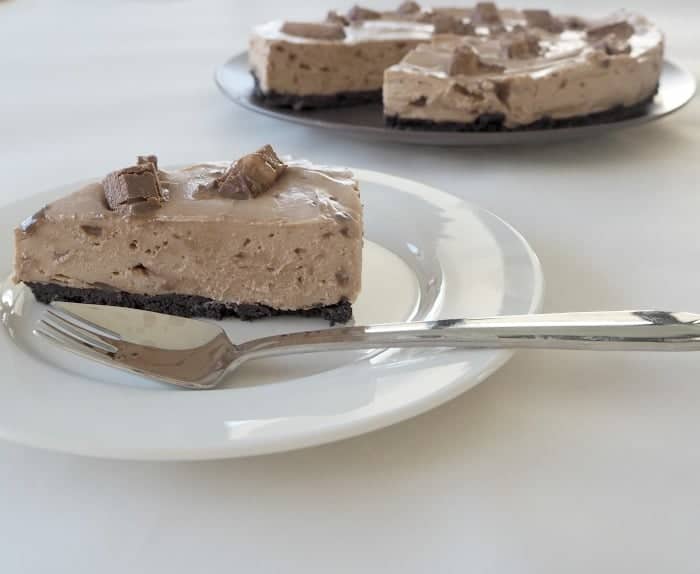
    This no bake Mars Bar Cheesecake is a great make ahead dessert and I personally think it tastes better the day after it has been made, when it’s been sitting out of the fridge for 20 minutes or so and the Mars Bar pieces inside and on top of it begin to melt – yum!

    The best Mars Bar Cheesecake Recipe

    No Bake Mars Bar Cheesecake

    Lauren
    4.78 from 44 votes
    Print Recipe Pin Recipe
    Prep Time 30 minutes mins
    Cook Time 6 hours hrs
    Total Time 6 hours hrs 30 minutes mins
    Course Dessert
    Servings 10
    Calories 44 kcal

    Ingredients
      

    • 200 g of Oreos - 1 box
    • 90 g of butter – melted
    • 500 g of cream cheese – softened
    • 130 g of thickened cream
    • 1 teaspoon of vanilla extract
    • 110 g of caster sugar
    • 6 x Mars Bars

    Instructions
     

    • Line the base of a 22cm springform tin with baking paper and lightly grease the sides. Set aside until needed.
    • Finely chop two of the Mars Bars and set aside until needed.
    • Process the chocolate ripple biscuits (or similar) until the resemble breadcrumbs. Add the melted butter and stir until combined.
    • Pour the biscuit mixture into your prepared tin and use a large metal spoon to cover the base with the mixture and flatten the surface.
    • In the bowl of an electric mixer, add the softened cream cheese, cream, caster sugar and vanilla extract and mix on a medium to high speed or until the mixture is thick, creamy and smooth.
    • Meanwhile, chop four Mars Bars into small pieces and place in a microwave safe bowl. Cook for 30 second spurts (stirring in between each cook) until they have melted.
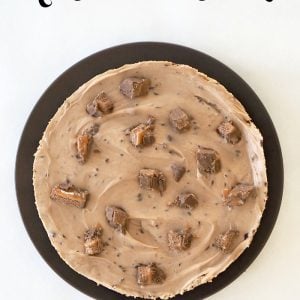
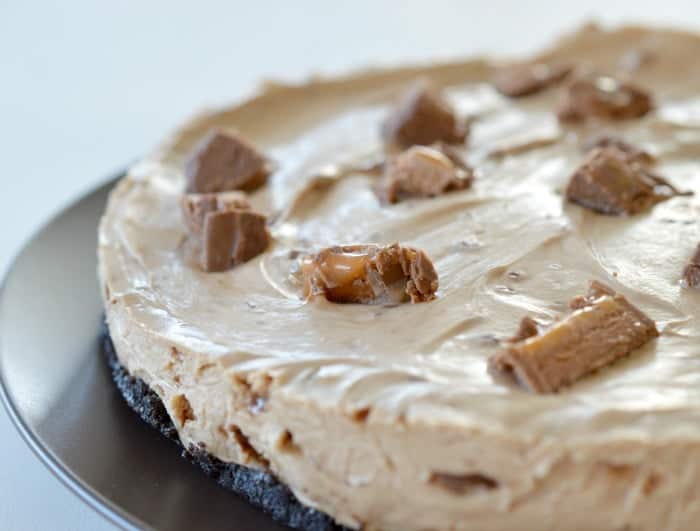
    • Add the melted Mars Bars to your cream cheese mixture and mix on a medium speed to combine. Remove the mixer bowl from the stand and gently stir through one of your chopped Mars Bars before pour the cheesecake mixture over the biscuit base and top with the remaining Mars Bar pieces.
    • Place in the fridge to set. Ideally you want to leave this overnight, but is should be ok after 6 hours.
    • Remove the set cheesecake from the fridge and serve.

    Nutrition

    Serving: 0gCalories: 44kcalCarbohydrates: 11gFat: 0.03gSodium: 0.1mgPotassium: 1mgSugar: 11gCalcium: 0.2mgIron: 0.01mg
    Tried this recipe? Please leave a rating and tag me on Instagram! Mention @createbakemake or tag #createbakemake!


    No Bake Mars Bar Cheesecake Thermomix Instructions

    1. Line the base of a 22cm springform tin with baking paper and lightly grease the sides and finely chop two Mars Bars into pieces – set aside until needed.

    2. Cut the butter in half and place into your Thermomix bowl.  Cook for 2 minutes on 60 degreesspeed 3 or until melted.

    3. Add the chocolate ripple biscuits and mix for 10 seconds on speed 9.  Use your spatula to scrape down the sides and mix again for another 10 seconds on speed 7.

    4. Pour the biscuit mixture into your prepared tin and use a large metal spoon to cover the base with the biscuit mixture and flatten the surface.

    5. Cut four of Mars Bars into quarters and place them in a clean Thermomix bowl.  Chop them for 10 seconds on speed 7 before cooking them for 3 minutes, 60 degrees, speed 2 or until melted.

    6. Add the vanilla extract, cream cheese, cream and caster sugar to the Thermomix bowl and mix for 30 seconds on speed 5. Scrape down the sides and mix for another 30 seconds on speed 5.

    7. Add ONE of the chopped Mars Bars to the Thermomix bowl and mix for 20 seconds on reverse speed 2.

    8. Pour the cheesecake mixture over the biscuit base and top with the remaining Mars Bar pieces.

    9. Place in the fridge to set. Ideally you want to leave this overnight, but is should be ok after 6 hours.

    10. Remove the set cheesecake from the fridge and serve.

    Notes

    The above mixing times may vary depending on the softness of your cream cheese and Mars Bars. I suggest using cream cheese and Mars Bars which are both at room temperature and are soft.

    This cheesecake is quite soft as it doesn’t contain gelatine. If your cheesecake is too soft or runny when you cut it – pop it back in the fridge to let it set for a bit longer.

    The best Mars Bar Cheesecake Recipe

    The best Mars Bar Cheesecake Recipe

    Do you love all things Mars Bar too? What’s your favourite Mars Bar recipe?

    « Chocolate Ripple Cake with Caramel
    Pikelet Recipe »

    Filed Under: Cheesecake, Chocolate, Desserts, Sweet, Thermomix

    Reader Interactions

    Comments

    1. Jen

      December 04, 2024 at 3:31 pm

      Yum!! Can you freeze this?

      Reply
    2. Stacey

      June 16, 2020 at 2:01 pm

      Easy to make, sweet and delicious!

      Reply
      • Lauren Matheson

        June 18, 2020 at 6:28 pm

        Thank you Stacey!

        Reply
    3. Lisa

      August 18, 2016 at 7:43 pm

      This looks great are they fun size Mars bar of large? Thanks

      Reply
      • Lauren

        August 19, 2016 at 11:13 am

        Hi Lisa, I always use the regular large sized Mars Bars – enjoy!

        Reply
        • Tamarah glanville

          December 20, 2016 at 8:44 am

          It says in the ingredients Oreos but then in the method ripple which one do you usually use

        • Lauren

          December 20, 2016 at 2:00 pm

          My apologies Tamarah, I use both!

      • Chilli Trish

        May 28, 2017 at 9:53 pm

        yummo…when ive made one previously i just use a fun bag of small mars bars which is cheaper than buying 6 big Mars bars…

        Reply
        • Lauren

          May 31, 2017 at 10:12 am

          That’s a great idea!

    4. bakeplaysmile

      January 23, 2016 at 6:46 am

      Yummo! One of my fave cheesecakes is this Mars Bar one! It’s always super popular! xx

      Reply
      • Lauren

        January 24, 2016 at 3:41 pm

        Thanks lovely x

        Reply
    5. HUgzilla

      January 20, 2016 at 8:30 pm

      You had me at “no bake”. And “Mars bar”. And “cheesecake”.

      Reply
      • Lauren

        January 24, 2016 at 3:42 pm

        Haha, thanks!

        Reply
    6. Jessica @ Sweetest Menu

      January 20, 2016 at 12:55 pm

      It doesn’t get any better Lauren! Cheesecake ALL the way!

      Reply
      • Lauren

        January 24, 2016 at 3:42 pm

        Thanks so much! You can’t go wrong with cheesecake 😉

        Reply
        • Daniellr

          June 15, 2021 at 12:55 am

          This was amazing. I only had part it set for just 6 hours and it was a bit runny and didn’t hold its shape when cut. BUT…. oh my goodness.. it tastes delicious. Next time I’ll just make it in advance, probably night before and hopefully it’ll set properly

    « Older Comments
    4.78 from 44 votes (44 ratings without comment)

    Leave a Reply Cancel reply

    Your email address will not be published. Required fields are marked *

    Recipe Rating


    Primary Sidebar

    Lauren placing sprinkles onto cupcakes in her kitchen

    Hi, I'm Lauren! As a Mum of three VERY hungry boys, I know what it’s like to need dinner on the the table FAST. All of my recipes are made using simple ingredients and you will also find both conventional and Thermomix cooking instructions.

    More about me →

    Lunchbox Snacks

    • three pieces of anzac slice stacked on top of each other.
      Anzac Slice

    • Condensed Milk Cookies Stacked in a pile
      Condensed Milk Cookies | Makes 100 Biscuits!

    • stack of banana pikelets on plate
      Easy Banana Pikelets Recipe

    • 3 Ingredient Marshmallow Rice Bubble Slice sitting on a white decorative platter.
      3 Ingredient Rice Bubble Bars Recipe

    Simple Family Dinners

    • spoon holding a baked chicken parma ball.
      Chicken Parma Balls

    • Creamy Chicken Pie cut in half on plate
      Creamy Chicken Pies | Homemade Chicken Pie Recipe

    • Roast Chicken on wooden board
      Air Fryer Roast Chicken | An Easy Family Friendly Dinner

    • Overhead view of two beef rissoles with a side of coleslaw on a grey speckled plate.
      Beef Rissoles

    Thermomix Recipe Books

    ThermoBliss 11 book complete set

    Browse the full range of books and eBooks here.

    Footer

    ↑ back to top

    About

    • About Me
    • Privacy Policy

    Newsletter

    • Sign Up! for emails and updates

    Contact

    • email: hello@createbakemake.com

    Copyright © 2024 Create Bake Make

    Please note that the content including images and recipes contained within the Create Bake Make website and recipe books are protected by copyright 2024. Adding and/or sharing of content from the Create Bake Make website or recipe books to third party websites or platforms is prohibited.

    Foodie Pro on the Foodie Pro Theme

    Rate This Recipe

    Your vote:


    A rating is required
    A name is required
    An email is required

    Recipe Ratings without Comment

    Something went wrong. Please try again.