• Skip to primary navigation
  • Skip to main content
  • Skip to primary sidebar
Create Bake Make
  • Home
  • Recipes
    • Biscuits and Cookies
    • Cakes and Muffins
    • Lunchbox Ideas
    • Slices
    • Dinners
    • Desserts
    • Snacks & Treats
    • Cheesecake
    • Breakfast
    • Party Food
    • Easter
    • Christmas
  • Thermomix
    • Thermomix Biscuits
    • Thermomix Cakes and Muffins
    • Thermomix Dinners
    • Thermomix Desserts
    • Thermomix Lunch Box Snacks
    • Thermomix Slices
    • Thermomix Easter Recipes
    • Thermomix Christmas Recipes
  • Food for Kids
  • SHOP
  • About
    • Facebook
    • Instagram
    • Pinterest
    • RSS
    • Twitter
menu icon
go to homepage
  • Lunchbox Ideas
  • Dinners
  • Thermomix Recipes
  • Sweet
  • All Recipes
  • Shop
    • Facebook
    • Instagram
    • Pinterest
  • subscribe
    search icon
    Homepage link
    • Lunchbox Ideas
    • Dinners
    • Thermomix Recipes
    • Sweet
    • All Recipes
    • Shop
    • Facebook
    • Instagram
    • Pinterest
  • ×
    • Two Chocolate Snickers Brownies sitting on top of each other.
      Snickers Chocolate Brownies
    • Biscoff Cheesecake
    • Overhead view of corn relish dip in a blue bowl surrounded by crackers.
      Corn Relish Dip
    • Cheese Sauce dripping from a silver spoon into a bowl.
      Thermomix Cheese Sauce
    • Slice of Focaccia on a white bench. In the background are more slices of Focaccia.
      Thermomix Focaccia
    • Two slices of biscoff brownies on top of each other. in the background in a jar of biscoff.
      Biscoff Brownies
    • Side view of Thermomix zucchini slice on a green plate
      Thermomix Zucchini Slice
    • Close up of Curried Eggs topped with chives on a blue plate.
      Curried Eggs
    • Two Margaritas made using a thermomix in glasses garnished with salt and lime.
      Thermomix Margaritas
    • Side view of Cranberry and Brie Puff Pastry Star with a piece of brie removed
      Cranberry and Brie Puff Pastry Star
    • Close up of a piece of Biscoff Fudge on a sheet of baking paper. In the background is more fudge and jar of Biscoff spread.
      Biscoff Fudge
    • Slice of Vanilla Sheet Cake sitting in front of a wire rack.
      Vanilla Sheet Cake
    Create Bake Make / Snacks & Treats / Ham, Cheese and Mustard Scrolls |A Simple Lunchbox Recipe

    Ham, Cheese and Mustard Scrolls |A Simple Lunchbox Recipe

    Published: Jan 28, 2019 · Modified: Aug 2, 2021 by Lauren Matheson ·

    45181 shares
    • Share
    • Tweet
    Jump to Recipe Print Recipe

    These easy Ham, Cheese and Mustard Scrolls are a hit in our house! They can be ready to enjoy in less than 45 minutes and require just a few basic ingredients. Also, they are great for lunch boxes, freezer friendly and can also be made using a Thermomix too.

    overhead view of ham cheese and mustard scrolls

    Why you will love this recipe:

    For a simple lunchbox recipe, you can’t go wrong with these yeast free Ham, Cheese and Mustard Scrolls.  The dough recipe for these scrolls is the same one that I use for our Vegemite and Cheese Scrolls, Hawaiian Pizza Scrolls and of course our favourite sweet scrolls – Cinnamon Scrolls.  It’s certainly not a traditional dough recipe, but it’s easy to work, you can add practically whatever scroll filling you like, and best of all, the kids love it!

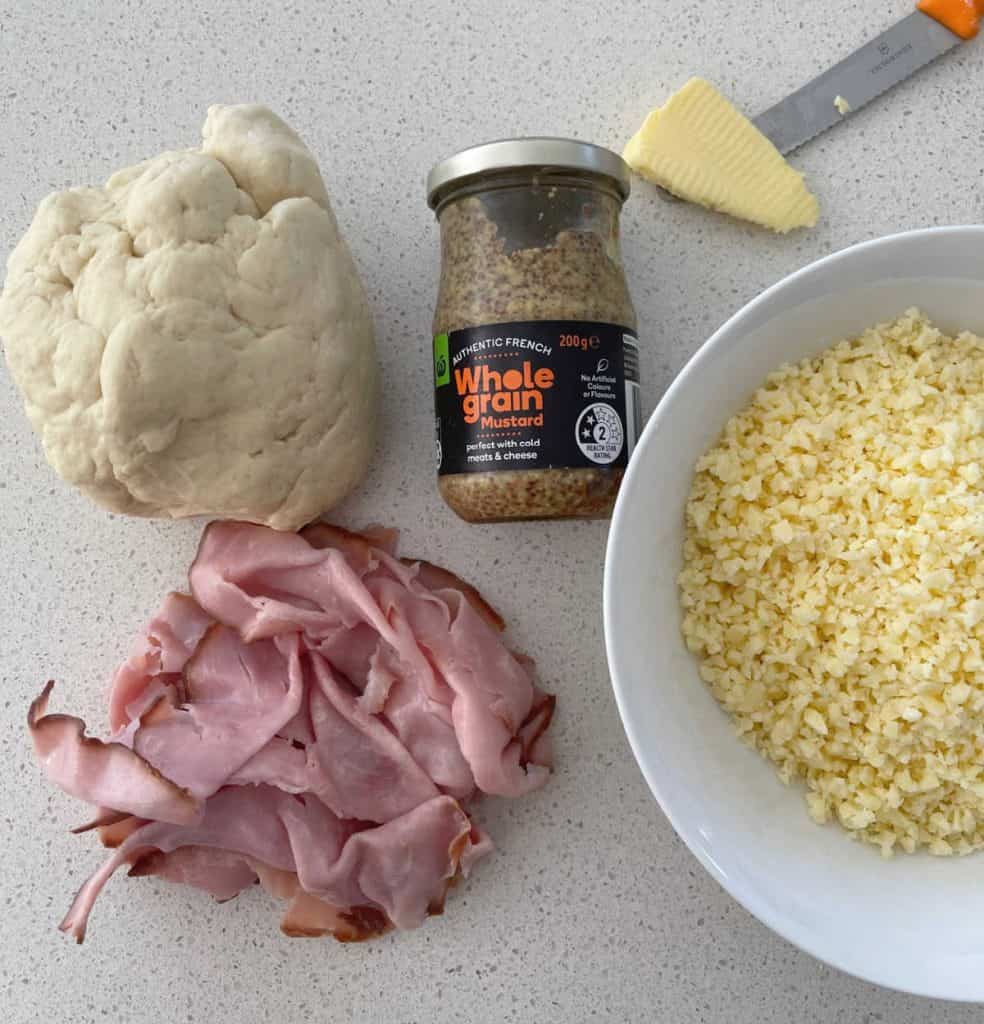
    Ham Cheese and Mustard Scrolls Ingredients:

    • Self-raising flour – you can use plain flour and 2 teaspoons instead of self-raising flour.
    • Mustard – I like to use seeded mustard however you can use any variety.
    • Ham – I often use the leftover ham from school lunches to make these scrolls, you can also use shaved, shredded or sliced ham.
    Ham and Cheese Scroll ingredients

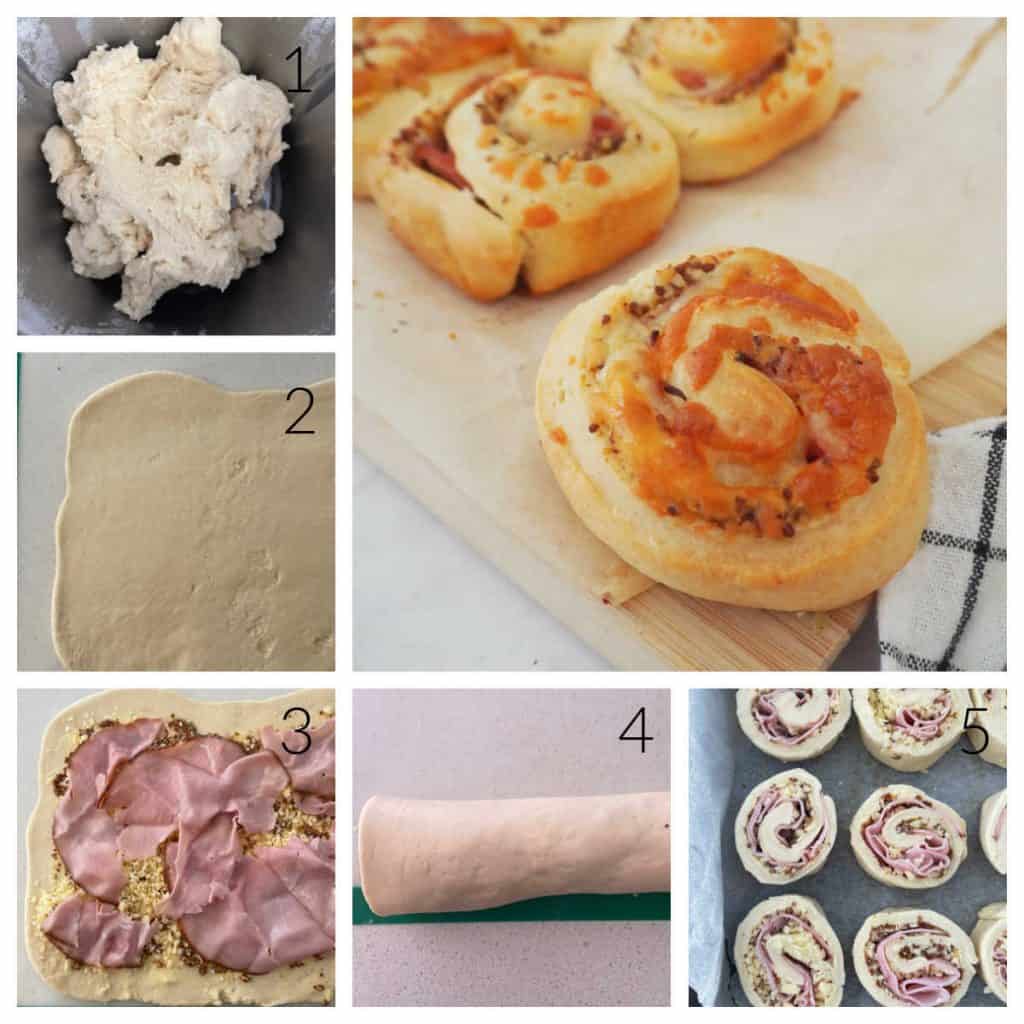
    How to Make these Scrolls:

    To make these scrolls you will need to:

    • Combine the ingredients for the dough and then lightly knead.
    • Roll out the dough into rectangle.
    • Add the filling ingredients.
    • Roll to enclose the filling.
    • Slice into pieces and place onto a baking tray.
    • Cook the scrolls until they are golden and cooked through.
    collage showing the steps to make ham and cheese scrolls

    My Tips for Making Ham Cheese and Mustard Scrolls:

    • When making these Ham, Cheese and Mustard Scrolls, if you are finding your dough is quite soft to work with (which can happen if it’s quite warm when you are putting these scrolls together), just pop it into the fridge for 20 minutes or so to chill and it will become firmer and easier to work with.    
    • I also recommend lightly dusting the bench with flour before rolling this dough out.
    • Once cooked, these scrolls can be frozen for up to two months, just pop them into a freezer safe container.
    • If you are making these Ham, Cheese and Mustard Scrolls for adults (or older kids) you can also add an extra tablespoon or two of seeded mustard to give them a little extra kick, however for the kids, I’d suggest sticking to three tablespoons.

    More easy recipes you might enjoy:

    • Apple and Cinnamon Scrolls
    • Rice Bubbles and Honey Slice
    • No Bake Apricot and Coconut Slice
    • Seedy Muesli Slice
    • Easy Yeast Free Cinnamon Scrolls
    • Healthy Sausage Rolls
    • Easy Savoury Muffin Recipe
    • Banana and Chocolate Chip Muffins
    • Easy Pikelet Recipe
    overhead view of ham cheese and mustard scrolls

    Ham, Cheese and Mustard Scrolls

    These Ham Cheese and Mustard Scrolls are such an easy lunchbox recipe! Both regular and Thermomix instructions included.
    4.73 from 18 votes
    Print Recipe Pin Recipe
    Prep Time 20 minutes mins
    Cook Time 25 minutes mins
    Total Time 45 minutes mins
    Course Kids Food, Lunchbox Ideas, Snacks
    Cuisine Australian
    Servings 12 Scrolls
    Calories 149 kcal

    Equipment

    • Baking Tray

    Ingredients
      

    • 2 cups self raising flour 300 grams -Plus extra to dust your bench with.
    • 90 grams butter
    • ½ teaspoon salt
    • ⅔ cup milk 170 grams

    For the Filling

    • 60 grams butter
    • 3 tablespoon seeded mustard
    • 100 grams grated tasty cheese
    • 150 grams ham
    • extra milk to brush the scrolls with

    Instructions
     

    • Preheat your oven to 210 degrees celsius (fan-forced) and line a tray with baking paper.
    • Sift the self raising flour and salt together in a large bowl and rub in the butter until the mixture is the consistency of bread crumbs.
    • Slowly add the milk and use a butter knife to combine.
    • Tip the dough out onto a bench and lightly knead until it forms a smooth ball. Use a rolling pin to roll dough out until you have a 30 x 40cm rectangle – approximately.
    • Spread the butter and mustard over the dough, making sure to leave a 2cm gap around the edges.
    • Brush one long edge with a little milk.
    • Scatter the ham and cheese over the dough
    • Starting at the long side (without milk) carefully roll the dough until enclosed.
    • Cut into 12 slices – approximately 2cm thick and place on a baking tray and sprinkle with the extra grated cheese.
    • Bake in oven for 25 minutes or until golden brown on top and cooked through.

    Thermomix Instructions

    • Preheat your oven to 210 degrees celsius (fan-forced) and line a tray with baking paper.
    • Place the flour, butter and salt into the Thermomix bowl and mix for 10 seconds on speed 9 until mixture is the same consistency as bread crumbs.
    • Add the milk and mix for 7 seconds on speed 4 to combine.
    • Use the kneading function to knead the dough for 2 minutes
    • Turn the dough out onto a floured bench and using a rolling pin, roll the dough out until you have a 30cm x 40cm rectangle.
    • Spread the butter and mustard over the dough, making sure to leave a 2cm gap around the edges.
    • Brush one long edge with a little milk.
    • Scatter the ham and cheese over the dough
    • Starting at the long side (without milk) carefully roll the dough until enclosed.
    • Cut into 12 slices – approximately 2cm thick and place on a baking tray and sprinkle with the extra grated cheese.
    • Bake in oven for 25 minutes or until golden brown on top and cooked through.

    Notes

    • When making these Ham, Cheese and Mustard Scrolls, if you are finding your dough is quite soft to work with (which can happen if it’s quite warm when you are putting these scrolls together), just pop it into the fridge for 20 minutes or so to chill and it will become firmer and easier to work with.    
    • I also recommend lightly dusting the bench with flour before rolling this dough out.
    • Once cooked, these scrolls can be frozen for up to two months, just pop them into a freezer safe container.
    • If you are making these Ham, Cheese and Mustard Scrolls for adults (or older kids) you can also add an extra tablespoon or two of seeded mustard to give them a little extra kick, however for the kids, I’d suggest sticking to three tablespoons.

    Nutrition

    Calories: 149kcalCarbohydrates: 17gProtein: 8gFat: 5gSaturated Fat: 2gPolyunsaturated Fat: 1gMonounsaturated Fat: 2gTrans Fat: 1gCholesterol: 17mgSodium: 359mgPotassium: 103mgFiber: 1gSugar: 1gVitamin A: 102IUVitamin C: 1mgCalcium: 78mgIron: 1mg
    Keyword Freezer Friendly, Thermomix
    Tried this recipe? Please leave a rating and tag me on Instagram! Mention @createbakemake or tag #createbakemake!

    Looking for even more?

    You can find even more easy snack recipes in our ThermoBliss Kids Snacks Books and Lunchbox Snack book. Shop the full range of books and eBooks here.

    Thermobliss books full set of covers
    « Raisin Muffins
    Zucchini Slice »

    Filed Under: Breakfast, Celebration Food, Food for Kids, Lunchbox Ideas, Party Food, Savoury, Snacks & Treats, Thermomix

    Reader Interactions

    Comments

    1. Neethu

      February 23, 2022 at 11:47 am

      Hi Lauren
      How do you go about reheating the frozen scrolls?

      Thanks.

      Reply
      • Lauren Matheson

        March 02, 2022 at 4:33 pm

        Hi, I would just pop them into the oven at 180 degrees celisus for 8 – 10 minutes. To stop them from browning too much you could cover with foil.

        Reply
    2. Sarah

      February 07, 2021 at 11:29 pm

      Is this baking temp celsius? It seems awfully low, but I’m not every experienced with fan-forced cooking.

      Reply
      • Lauren Matheson

        February 08, 2021 at 4:21 am

        Hi Sarah, yes it’s in celsius 🙂

        Reply
    3. Frank

      March 18, 2019 at 8:49 am

      Can you use ready pastry from supermarket and if so what pastry do you buy.

      Reply
      • Lauren Matheson

        March 19, 2019 at 6:03 am

        Hi Frank, you can use ready made pastry, I would use puff pastry 🙂

        Reply
    4.73 from 18 votes (18 ratings without comment)

    Leave a Reply Cancel reply

    Your email address will not be published. Required fields are marked *

    Recipe Rating


    Primary Sidebar

    Lauren placing sprinkles onto cupcakes in her kitchen

    Hi, I'm Lauren! As a Mum of three VERY hungry boys, I know what it’s like to need dinner on the the table FAST. All of my recipes are made using simple ingredients and you will also find both conventional and Thermomix cooking instructions.

    More about me →

    Lunchbox Snacks

    • three pieces of anzac slice stacked on top of each other.
      Anzac Slice

    • Condensed Milk Cookies Stacked in a pile
      Condensed Milk Cookies | Makes 100 Biscuits!

    • stack of banana pikelets on plate
      Easy Banana Pikelets Recipe

    • 3 Ingredient Marshmallow Rice Bubble Slice sitting on a white decorative platter.
      3 Ingredient Rice Bubble Bars Recipe

    Simple Family Dinners

    • spoon holding a baked chicken parma ball.
      Chicken Parma Balls

    • Creamy Chicken Pie cut in half on plate
      Creamy Chicken Pies | Homemade Chicken Pie Recipe

    • Roast Chicken on wooden board
      Air Fryer Roast Chicken | An Easy Family Friendly Dinner

    • Overhead view of two beef rissoles with a side of coleslaw on a grey speckled plate.
      Beef Rissoles

    Thermomix Recipe Books

    ThermoBliss 11 book complete set

    Browse the full range of books and eBooks here.

    Footer

    ↑ back to top

    About

    • About Me
    • Privacy Policy

    Newsletter

    • Sign Up! for emails and updates

    Contact

    • email: hello@createbakemake.com

    Copyright © 2024 Create Bake Make

    Please note that the content including images and recipes contained within the Create Bake Make website and recipe books are protected by copyright 2024. Adding and/or sharing of content from the Create Bake Make website or recipe books to third party websites or platforms is prohibited.

    Foodie Pro on the Foodie Pro Theme

    Rate This Recipe

    Your vote:


    A rating is required
    A name is required
    An email is required

    Recipe Ratings without Comment

    Something went wrong. Please try again.