• Skip to primary navigation
  • Skip to main content
  • Skip to primary sidebar
Create Bake Make
  • Home
  • Recipes
    • Biscuits and Cookies
    • Cakes and Muffins
    • Lunchbox Ideas
    • Slices
    • Dinners
    • Desserts
    • Snacks & Treats
    • Cheesecake
    • Breakfast
    • Party Food
    • Easter
    • Christmas
  • Thermomix
    • Thermomix Biscuits
    • Thermomix Cakes and Muffins
    • Thermomix Dinners
    • Thermomix Desserts
    • Thermomix Lunch Box Snacks
    • Thermomix Slices
    • Thermomix Easter Recipes
    • Thermomix Christmas Recipes
  • Food for Kids
  • SHOP
  • About
    • Facebook
    • Instagram
    • Pinterest
    • RSS
    • Twitter
menu icon
go to homepage
  • Lunchbox Ideas
  • Dinners
  • Thermomix Recipes
  • Sweet
  • All Recipes
  • Shop
    • Facebook
    • Instagram
    • Pinterest
  • subscribe
    search icon
    Homepage link
    • Lunchbox Ideas
    • Dinners
    • Thermomix Recipes
    • Sweet
    • All Recipes
    • Shop
    • Facebook
    • Instagram
    • Pinterest
  • ×
    Create Bake Make / Celebration Food / Mint Cheesecake Balls

    Mint Cheesecake Balls

    Published: Dec 31, 2014 · Modified: Nov 2, 2015 by Lauren Matheson ·

    499 shares
    • Share
    • Tweet

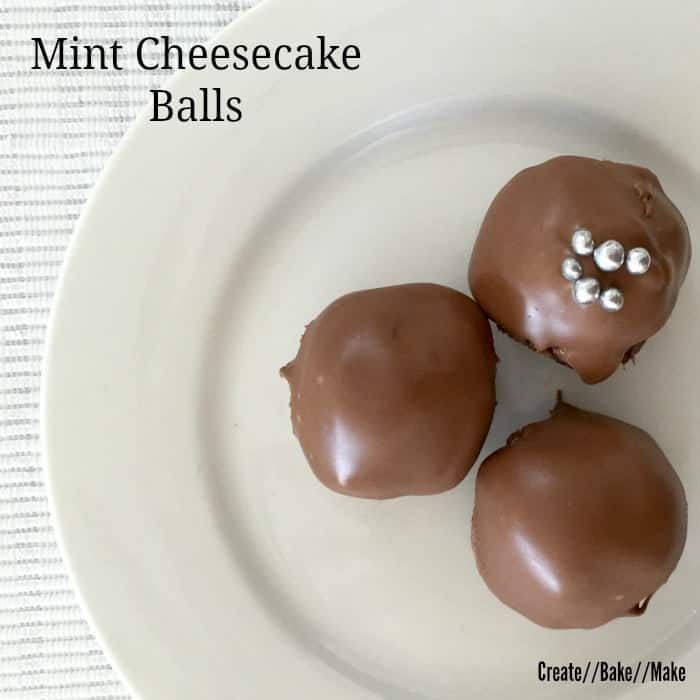
    Do you leave things to the last minute? Have people coming over and have forgotten to get dessert? If you are looking for an easy dessert (or just a sweet treat) that will impress your guests, you cannot go past these Mint Cheesecake Balls! All it takes is three ingredients (extra if you want to decorate them) to create these delicious mint and chocolate balls – what are you waiting for?!

    Mint cheesecake balls

    You will need:

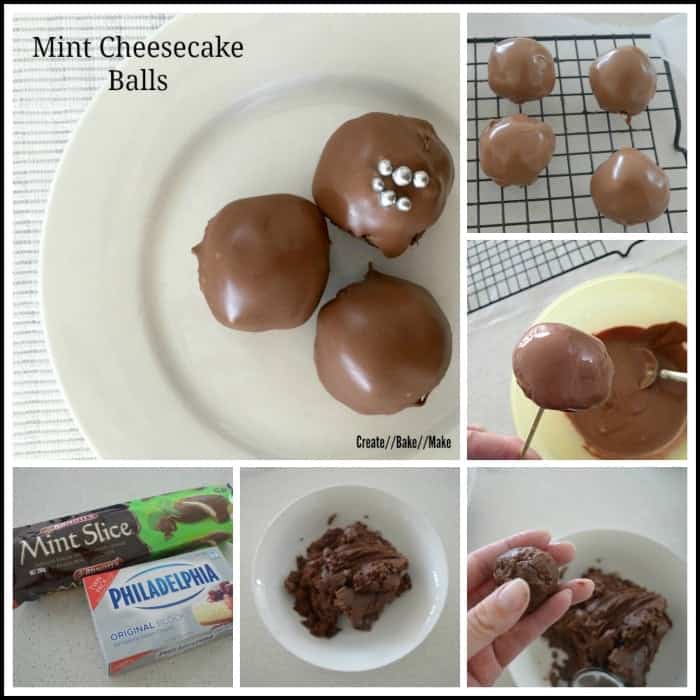
    200g pack of Chocolate Mint Slice Biscuits

    250g of cream cheese – softened

    200g of milk chocolate

    Sprinkles to decorate.

    Let’s put it together!

    1. Line a baking tray (or plate) with baking paper and set aside until needed.

    2Using a food processor, blend until the Mint Slice Biscuits are crumbs.

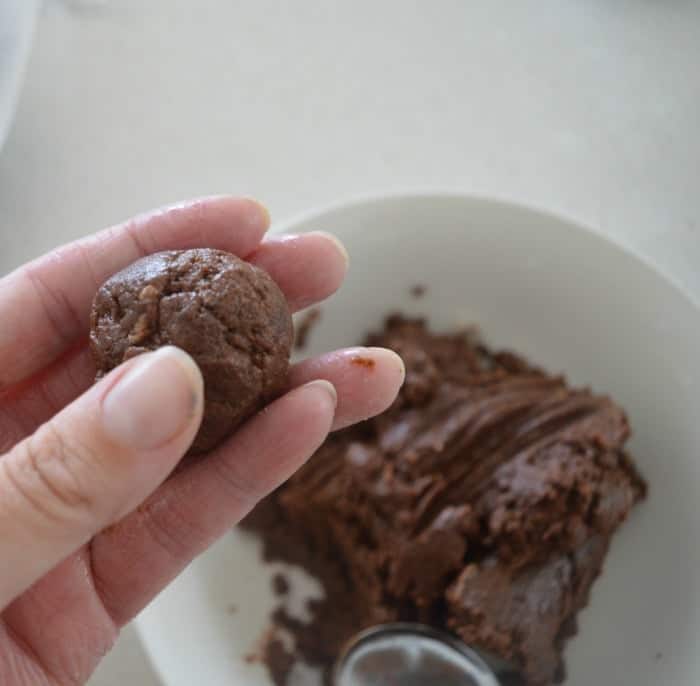
     3. Add the softened cream cheese and blend until combined.

    4. Roll the mixture into balls (I made mine dessert spoon sized) and place on tray. Continue until all the mixture has been used.

    mint balls 2

    5. Place tray/plate into the freezer for a minimum of half an hour, you want the balls to be very firm.

    6. Break the milk chocolate into pieces and place in a microwave safe bowl to melt (you can also melt the chocolate in a bowl sitting above a saucepan on boiling water on the stove). I cook the chocolate for 30 second spurts until it’s almost melted and then mix until it’s completely melted.

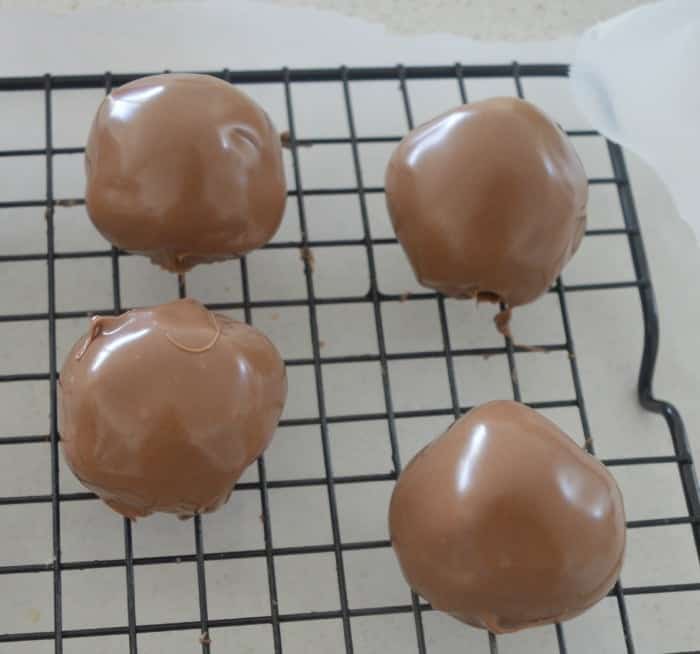
    7. Remove the balls from the freezer.  Poke a skewer into the bottom of the balls and dip them in the melted chocolate.  Place on a wire rack to set.  Repeat until all the balls are coated.

    mint balls 3

    8. Decorate the balls while the chocolate is still soft with sprinkles, hundreds and thousands or even melted white chocolate.

    9. Put the balls back into the freezer for half an hour, or until the milk chocolate has set.

    Enjoy!

    Mint Cheesecake Balls Thermomix Instructions

    1. As above.

    2. Place the Mint Slice Biscuits in Thermomix bowl and blitz for 5 seconds on speed 7.

    3. Add the softened cream cheese to the bowl with the crushed Mint Slice biscuits and blitz for 10 seconds on speed 5 until combined – it may take a little longer if your cream cheese isn’t completely soft.

    Follow above from step 4.

    Mint Cheesecake Balls Collage

    What is your favourite last minute dessert?

    « Christmas Recipe Collection
    Toblerone and Mars Bar Cheesecake Slice »

    Filed Under: Celebration Food, Cheesecake, Desserts, Snacks & Treats, Sweet, Thermomix

    Reader Interactions

    Comments

    1. jo

      February 21, 2017 at 7:25 pm

      These look freat, would you store them in the freezer and couls you make some in advance..say a week ..and they keep well???

      Reply
    2. Kate Lloyd

      May 22, 2016 at 5:01 pm

      Yuuuuum and so easy!

      Reply
      • Lauren

        May 23, 2016 at 2:58 pm

        Thanks Kate 🙂

        Reply
    3. ana

      January 09, 2015 at 6:18 am

      YUM! I imagine you’d be pretty popular bringing these along to a get together.

      Reply
    4. ann

      January 03, 2015 at 6:11 pm

      I totally need one of these right now!!

      Reply

    Leave a Reply Cancel reply

    Your email address will not be published. Required fields are marked *

    Recipe Rating


    Primary Sidebar

    Lauren placing sprinkles onto cupcakes in her kitchen

    Hi, I'm Lauren! As a Mum of three VERY hungry boys, I know what it’s like to need dinner on the the table FAST. All of my recipes are made using simple ingredients and you will also find both conventional and Thermomix cooking instructions.

    More about me →

    Lunchbox Snacks

    • three pieces of anzac slice stacked on top of each other.
      Anzac Slice
    • Condensed Milk Cookies Stacked in a pile
      Condensed Milk Cookies | Makes 100 Biscuits!
    • stack of banana pikelets on plate
      Easy Banana Pikelets Recipe
    • 3 Ingredient Rice Bubble Bars Recipe

    Simple Family Dinners

    • spoon holding a baked chicken parma ball.
      Chicken Parma Balls
    • Creamy Chicken Pie cut in half on plate
      Creamy Chicken Pies | Homemade Chicken Pie Recipe
    • Roast Chicken on wooden board
      Air Fryer Roast Chicken | An Easy Family Friendly Dinner
    • Beef Rissoles on a plate
      Rissoles Recipe | Made with Beef and Vegetables

    Thermomix Recipe Books

    ThermoBliss 11 book complete set

    Browse the full range of books and eBooks here.

    Footer

    ↑ back to top

    About

    • About Me
    • Privacy Policy

    Newsletter

    • Sign Up! for emails and updates

    Contact

    • email: hello@createbakemake.com

    Copyright © 2021 Create Bake Make

    Foodie Pro on the Foodie Pro Theme

    Exclusive Member of MediaVine Food