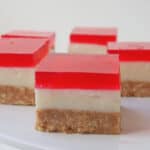
The BEST Jelly Slice Recipe
This really is the best Jelly Slice recipe you will ever make - I promise! Both regular and Thermomix instructions are included.
Servings: 24 slices
Calories: 106kcal
Cost: $10
Equipment
- 1 x 28 x 18cm slice tin
Ingredients
- 250 grams Marie biscuits - or any other plain biscuit - or any other plain biscuit
- 180 grams butter melted
- 395 grams sweetened condensed milk
- 2 & ½ teaspoons gelatine
- ¾ cup boiling water
- 2 Lemons juiced
- 1 packet to strawberry jelly
- Boiling Water as per jelly packet instructions
- An extra 1 teaspoon of gelatine – for the jelly top
Instructions
- Line the base and the sides of a slice tin with baking paper, making sure you leave plenty hanging over the sides.
- Crush the biscuits until they resemble fine breadcrumbs. You can use a rolling pin or food processor.
- Add the melted butter to the crushed biscuits and mix until combined. Pour the mixture into the lined slice tine and press down with the back of a metal spoon and place in the fridge to chill.
- In the meantime, add 2 1/12 teaspoons of gelatine to ¾ of a cup of boiling water and stir until it has dissolved. Place the condensed milk into a bowl and while whisking, add the dissolved gelatine mixture and the lemon juice. Continue to whisk until mixture is smooth and has combined.
- Remove the set biscuit base from the fridge and pour over the condensed milk layer. Place back in the fridge, until it just begins to start to set – approximately 30 - 45 minutes
- While the slice is chilling, you can make the strawberry jelly as per the packet instructions – adding an extra teaspoon of gelatine. Allow the jelly to cool until it has reached room temperature.
- Remove the slice from the fridge and carefully pour the jelly over the slice and place it back in the fridge to completely set approximately 6 hours – overnight is best.
- Remove the set slice from the fridge and using a hot knife, cut into squares.
Thermomix Instructions
- Line the base and the sides of a slice tin with baking paper, making sure you leave plenty hanging over the sides.
- Place the biscuits in the bowl and crush for 5 seconds on speed 9.
- Add the butter and heat for 3 minutes on 80 degrees speed 2.
- Remove biscuit mixture from the bowl and pour into the lined tray. Push the mixture down with a metal spoon to create a flat surface. Place in the fridge for 30 minutes to set.
- To make the filling, combine the gelatine in a jug with the boiling water and allow to cool slightly. In a clean bowl, add the lemon juice and condensed milk and mix for 45 seconds on speed 4. After 5 seconds, remove the measuring cup and carefully pour the gelatine mixture in. Remove the set slice base from the fridge and pour over the filling.
- Put back into the fridge for 30 minutes.
- In a clean Thermomix bowl, add the hot water and heat for 3 minutes on 90 degrees speed 2.
- Add the jelly crystals and one extra teaspoon of gelatine and stir until they have dissolved. Pour jelly into another bowl and allow it to cool until it has reached room temperature.
- Remove the slice from the fridge and carefully pour the jelly over the slice and place it back in the fridge to set for approximately 4 hours – overnight is best.
- Remove the set slice from the fridge and cut into squares.
Notes
When adding the Jelly layer, I recommend pouring the jelly onto the back of a spoon before it lands on the cheesecake layer.
It is important to have extra baking paper hanging over the edges of the tin as this will help support the slice when all three layers are added.
If you try and pour jelly which is still a little warm over the cheesecake layer which hasn't chilled for long enough you are going to end up with 'holes' filled with jelly in your slice - this doesn't change the taste but can be an issue when you try to cut it into neat little squares.
I also suggest you place the tin you are making your Jelly Slice in, onto a baking tray before you add the jelly. This will make is a whole lot easier to transfer into the fridge.
You can use any brand of Jelly to make this recipe (we use aeroplane jelly), just follow the instructions on the back of the pack and add the extra gelatine to it as per the recipe instructions below.
Store this Jelly Slice in an airtight container in the fridge and enjoy within seven days.
Nutrition
Serving: 0g | Calories: 106kcal | Carbohydrates: 18g | Protein: 3g | Fat: 3g | Saturated Fat: 1g | Cholesterol: 6mg | Sodium: 80mg | Potassium: 98mg | Fiber: 1g | Sugar: 13g | Vitamin A: 59IU | Vitamin C: 5mg | Calcium: 60mg | Iron: 1mg
